Faced with poor signal strength, I recently decided to replace my SOHO (small office/home office) wireless router with an enterprise grade solution.
Meet my new Cisco Aironet 1231 access point. Today I will be explaining the steps required to get a Cisco access point up and running in your home.
Step 1: Purchasing
Deciding what to look for is important. The 1231 I purchased is not the newest AP Cisco has created, but it suits my needs perfectly and it was cheap. If you're looking for something newer, try a Cisco 1241 series wireless access point. You can always compare features on Cisco's website to determine if what you're buying is what you need.
I absolutely recommend looking for APs on Ebay. I bought mine for $18 (less $11 shipping) on Ebay. Companies that are updating to the newest gear often sell their old stuff to Ebay wholesalers for next to nothing, passing the low prices on to you. Alternatively, there are plenty of other Cisco resellers on the web, search Google if this is the route you want to go.
When deciding what AP to purchase, the model number is absolutely the most important part of the decision. Cisco has two types of APs, autonomous and lightweight.
Lightweight APs
Lightweight APs will have a model number starting with:
air-lapxxxx
or
air-capxxxx (on the newest models)
where 'xxxx' is the series of the AP. For example, a lightweight 1231 series AP would have a model number starting with air-lap1231. You do not want to buy an AP with a model number like this.
Autonomous APs
Autonomous APs will have a model number starting with
air-apxxxx
where again 'xxxx' is the series of the AP. An autonomous 1231 series AP (like mine!) would have a model number starting with air-ap1231. You do want to buy an AP with a model number like this.
What's The Difference?
Autonomous APs are designed to work as a standalone unit. The configuration for the AP is stored on the AP and each AP is configured separately.
Lightweight APs are designed to work in what is called a WLAN group. Lightweight APs do not store their configuration locally; instead they connect to a Cisco WLAN controller to receive their configuration. Lightweight APs are useful in situations where a multitude of APs are going to be deployed and going through and configuring each one independently is just not feasible. For example, the organization I work for has nearly 1000 APs throughout our campus. We have 8 WLAN controllers to handle all these APs. Managing all 1000 APs and making sure the configuration for each is the same would be a nearly impossible task. Adding additional coverage would also be a nightmare.
In an at home scenario you're likely to have one, maybe two APs tops. This coupled with the fact that even a small controller for only a few APs costs upwards of $1500 (the ones we use at work cost $40,000 each) makes autonomous APs the way to go unless you literally have money to throw away.
If for some reason in the future your wireless installation expands to the point where lightweight APs become a consideration, you can convert autonomous APs to lightweight mode. You can not convert lightweight APs to autonomous mode.
Other Model Number Considerations
The autonomous/lightweight designation is only the first part of a model number. The full model number of my AP is air-ap1231g-A-K9. The 'g' designation means that it supports the 802.11g wireless standard. if the model number was air-ap1231b-A-K9 it would mean that the AP only supported the 802.11b standard. The newest APs will have something like air-apxxxxn-A-K9 which means they support the 802.11n standard.
I recommend looking for an AP that is at least 802.11g capable as wireless G is about as much as most home users will need. If you can get a good deal on an 802.11n AP, go for it as wireless N is the newest and fastest standard. Avoid 802.11b gear as this is an older standard which doesn't deliver as much throughput as its newer counterparts. Check here for a complete rundown of the differences between the wireless standards.
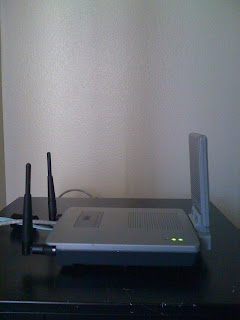
As a note, most Cisco APs also do 802.11A (The beaver tail looking thing on mine is a wireless A add-in transmitter) but not a lot of devices you're going to see in your home are wireless A compatible. I don't even have my wireless A antenna broadcasting (more on this later) because I have no devices that can utilize the signal.
Additional Purchasing Considerations
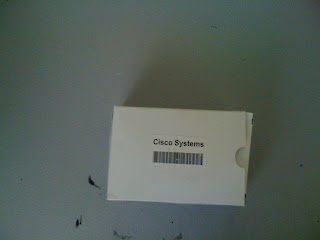
Depending on where you buy your AP, you may need to purchase a few additional items. Make note of what is included in your Ebay auction or other purchase and choose accordingly.
Power Brick
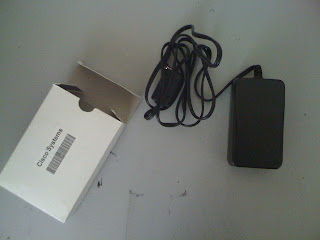
Some people cheap out and don't include the power brick in the purchase. You can find them for about $1.50 online. Every Cisco power brick I've ever seen has a 48V, .38A output.
Cisco Serial Cable
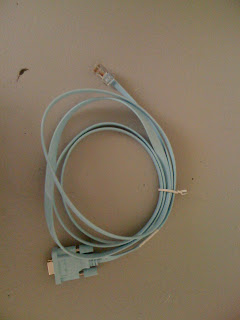
If you're computer has a serial port, you can use this baby blue cable to access the AP's console. Not specifically necessary as you can also access the console via SSH or telnet. Most of the time you wont need to access the console anyway; buy one if you want one.
Mounting Kit
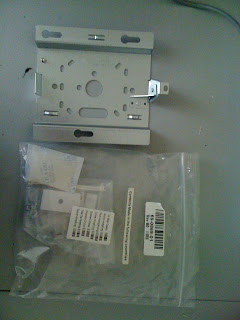
Every new AP comes with one of these kits that includes a mounting bracket and various screws. Many online retailers don't include this kit with a purchase. If you want to mount your AP on a wall or roof, you'll need a mounting bracket. The mounting brackets are AP specific, so make sure you get the right one for your particular AP.
Power Injector

Lets say you want to mount your new AP on the roof of your living room because that's where you use your wireless devices the most. Chances are, you don't have a power ooutlet on the ceiling in your living room, or anywhere for that matter. Power injector to the rescue! A power injector allows you to send power over the ethernet cable you'll be plugging into the AP, elimination the need to plug the AP directly into wall power. Essentially, the power injector plugs into a wall outlet. One port on the power injector goes to the router, and the other port on the power injector goes to the AP. Voilla! No need to plug in the AP directly. This technology is called power over ethernet and is becoming more commonplace.
Cables

Depending on what you do or don't have on hand you might need to buy some additional ethernet cables. Sizes you need will be very installation specific so I'll let you figure that out. On a side note, buy Cat6 cables as they're the newest technology and you'll pay a premium for Cat5 nowadays anyway. Online vendors are often cheaper than your local electronics store. I like
Cablesys but shop around.
Step 2: Configuration
Once your AP arrives in the mail, it's time to set it up. The best practice is generally to reset the AP once it arrives. Hold the mode button for about 2 seconds as you plug the AP in. The indicator LEDs will turn amber to indicate the AP is resetting (This process may vary depending on the model, Google is your friend). This removes any previous configuration the previous owner may have had and configures the AP to use DHCP to get an address.
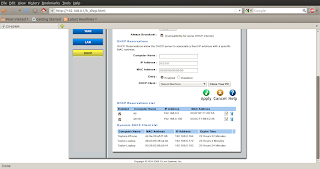
Once the AP is reset, plug the port labeled 'Ethernet' into your router (the port labeled 'Console' is where the baby blue serial cable goes). Once the AP boots, its time to find out what address it pulled. This will vary from router to router but it's generally under a tab labeled 'DHCP' or the like. Here's what the page on my D-link router looks like:
 The default hostname is "ap." Migrate to whatever address the AP has in a browser, in my case, 192.168.0.2.
You'll get a login dialog like this:
 Default user name is 'Cisco'
Default password is 'Cisco'
After logging in, you'll be greeted by a page like this:
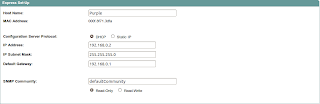
Migrate to the Express Set-Up tab on the left hand menu.
Set A hostname. Whatever you want to enter here is fine, just something to identify the AP on the network.
Choose how the AP will get an IP Address. I'd leave this set to DHCP unless you're comfortable enough with subnetting to set a static address.
 Scroll down to the radio section. Your page may look different than mine depending on how how many different radios your particular AP has.
One of the beauty of these enterprise APs is the number of things you can use them for, but for now we're just going to select access point.
You can choose radio optimization based on your situation. If your house is relatively small and the AP is in a central location, you can probably choose "throughput." If you're house is large or the AP is located far away from where you want the wireless signal you'll probably want to choose "range." You can experiment with these settings once the AP is up and running to see which gives you the best results.
You can choose to disable aironet extensions if you wish. You won't be able to take advantage of them unless you have an aironet wireless card for your laptop or other device.

Migrate to the Express Security tab on the left hand side of the screen.
Choose an SSID. This is the name of the wireless network that your devices will connect to.
The broadcast SSID in beacon checkbox will make your network hidden if not selected. Select it unless you know what a hidden network is.
Select 'No VLAN' unless you have VLANs in which case you probably won't need to read this article.
Enable AT LEAST WEP security. WEP isn't the most secure protocol out there, but it's better than nothing. 128 bit is preferable over 40 bit. To enable WPA you'll need a radius server (A topic for another article).
Click Apply once you've filled in all the settings.
Now it's finally time to enable the radios and connect to the network!
Click the Network Interfaces tab on the left hand side and then whichever radio you wish to enable (802.11G in my case).
Click the settings tab at the top of the screen.
Check Enable for the Enable Radio option.
Select Access point for the Role in the network
Select whichever suits your installation best for the data rates option (you can always come back and experiment later).
All the other options on the page should be auto populated. If for some reason they're not, copying my settings should work fine.
Click Apply. Correct any error popups that may occur.
Click the Home tab on the left hand side. Congratulations, your radio should now show up and you'll be able to connect to your new wireless network! Enable any additional radios you want following the same process.

One good practice is to change the default username and password under the Security tab. Now that you're well versed with the Cisco web GUI, this should be a breeze to figure out.

 You can change the name and comment to your liking. The -m in the command means transmission will start minimized, remove it if you want it to start visible.


